How to create Test Cases
Video Guideline#
Video - How to create test cases
Description#
What is a Test Case?#
A Test Case is a set of instructions that describe the steps to be taken to verify that a particular software feature or function works as expected. It includes test data, preconditions, expected results and postconditions.
Test cases are beneficial in exhaustive testing-a software testing approach that involves testing every possible data combination.
What are the features of a Test Case?#
The feature of a test case includes the following:
- Test Case ID
- Test Case Description
- Test Steps
- Test Data
- Expected Result
What is the purpose of a Test Case?#
The purpose of a Test Case is to determine if different features within a system are performing as expected and to confirm that the system satisfies all related standards, guidelines, and customer requirements.
Test cases help to check if a particular module/software is meeting the specified requirement or not. They determine if a particular module/ software work with a given set of conditions and help to narrow down the software needs and required updates.
Why steps are needed in test cases?#
Test cases are the set of steps that need to be done in order to test a specific function of the software. They are developed for various scenarios so that testers can determine whether the software is working the way it should and producing the expected results.
The steps are an essential part of the test case because without them, you can't understand the test cases. When you hand over the tests, it will be easier for the other person to execute those test cases.
If an issue occurs in the future and your PM asks what steps did you perform, the steps will be proof that you tested the features.
Why actions are added to test cases in converting to the automated test cases?#
Actions are added to test cases in converting to the automated test case because automation requires more detailed instructions than manual testing.
Automated tests require specific actions to be taken on the application under test, such as clicking buttons, entering text into fields, and selecting options from drop-down lists. These actions are added to the automated test case so that the automation tool can execute them.
What does priority mean?#
Priority is an attribute that help users define the order in which they want the test cases to be executed. When you have multiple test cases and want them to run in a particular order, you can use the priority attribute to set test priority.
Why browser is needed to run a test case?#
A browser is needed to run a test case because it is the platform on which the application is tested. The browser is used to interact with the application and test its functionality.
Functions that are needed to edit a Test Case:#
| Functions | Description |
|---|---|
| Deploy Test Case | Refers to the process of running a test case. |
| Debug Test Case | Allows the user to debug a test case (run only specific steps or specific actions). |
| Copy Test Case | Copies a test case into the same project and team. |
| Create Steps | Allows the user to create steps independently of test cases. |
| Step's Action Format | It is the basic format that is used for preparing a test case. |
| Auto Calculate Average Step Time | It is the automated calculation system for getting the average step duration from previous run histories. |
The tabs needed for edit a Test Case:#
| Tab | Description |
|---|---|
| Details | Details of a test case. |
| Steps | Steps that are related to the test case. |
| Related Items | Ticket ID, Test Case ID, and Requirment IDs are given here and also can be updated. |
| Discussion | A particular test case can be discussed through comments, example - discussions around the design of a test case. |
| Run History | Deployment history of a particular test case. |
| Attachments | Attachments to be used inside the test case. |
| Tasks | Link one or more related Tasks to a particular test case. |
| Bugs | Link one or more related Bugs to a particular test case. |
| Documents | Link one or more related Documents to a particular test case. |
| Test Cases | Link one or more related Test Cases or create a new test case. |
| Versions | Compare and save the current Version to a test case. Allows restoration of earlier versions. |
| History | Stores the run status history of a particular test case. |
| Follow | Allows adding / customizing followers (other users) so that they get notified of the changes for the followed items. |
| Review | Mainly Review about the test cases that have been prepared. |
Details Tab of the Test Case:#
Status: It is the required item of the test case.
And it indicates whether the test case is ready to deploy.Possible Values: In-progress, Complete.
Automatability: Automatability tab is required for the test case and indicates whether the test case is fully or partially automated or not.
Possible Values: Automatability, Easy to Automate, Hard to Automate, Not Automatable, Performance, Undefined.
Folder: It is similar to folders in windows/mac/linux, allows users to organize their test cases in hierarchial format and it is the required item for the test case.
Possible Values: Any ZeuZ folder and to create a new folder, need to click on "+" sign for it.
Feature: A Feature is provided to allow organization of test cases according to the features of the application under test (e.g. Profile module, Dashboard module, etc). It is the required item for the test case.
Possible Values: Any ZeuZ feature and click on "+" sign to create a new Feature.
Priority: It is the required item for the test case and indicates the priority of the test cases.
Possible Values: P1-Highest priority, P2-Medium priority, P3-Lower medium priority, P4-Lowest priority.
Labels: It is an optional item for the test case and used to attach custom labels to the test cases.
Possible Values: Any custom label of ZeuZ and click on "+" sign to create a new label.
Sets: It is an optional item for the test case and used to attach test sets to the test cases.
Possible Values: Any test set of ZeuZ and click on "+ NEW SET" sign to create a new set.
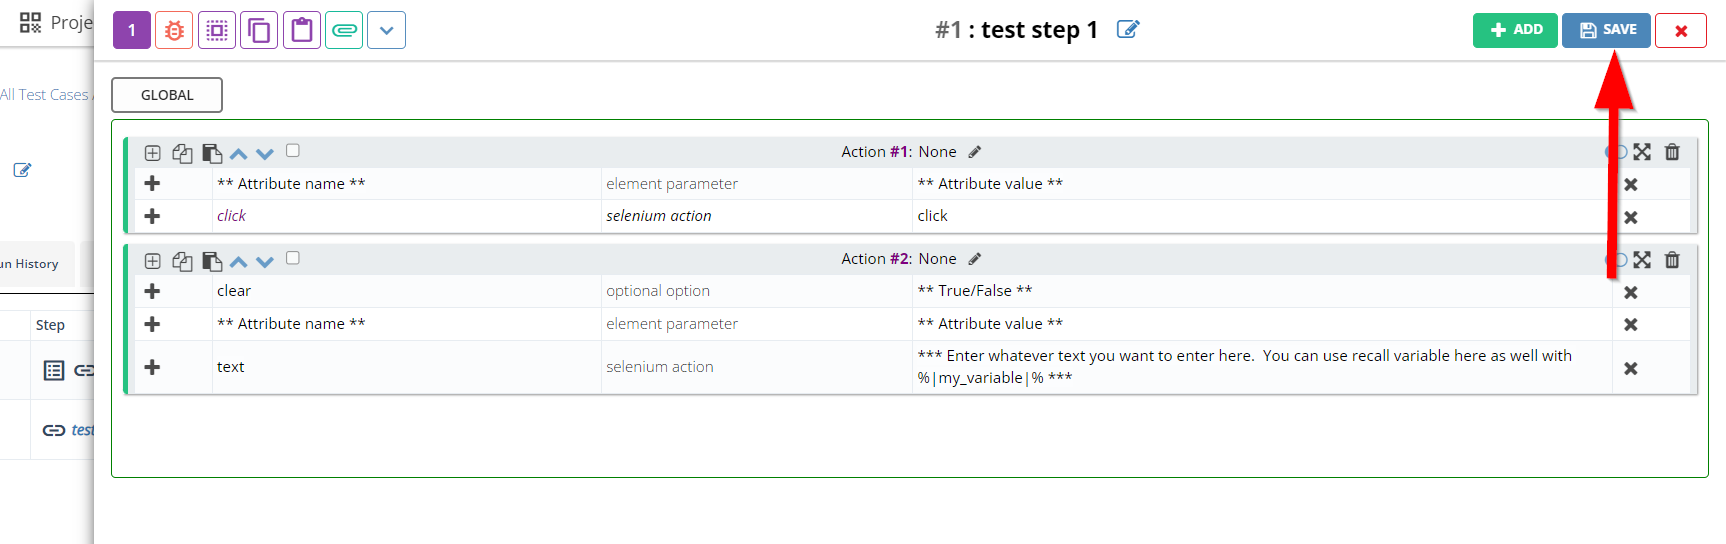
Steps Tab of the Test Case:#
Add Button: This is mainly used for adding a new row during making a test case and for addition of a new row, click on the "+" sign.
Steps: Here, we need to set actions for the test cases step by step and actions can be chosen just by clicking on the "ADD" button and deployment of the test case is also possible here and through click on "SAVE" button, actions will be saved. However, several options are available in "Step" like:
- Continue on fail
- Debug of this step
- Step info
- Expand/Collapse all actions
- Copy actions
- Paste actions
- Step attachments
- Step versions
- Run on fail
- Show difference.
note
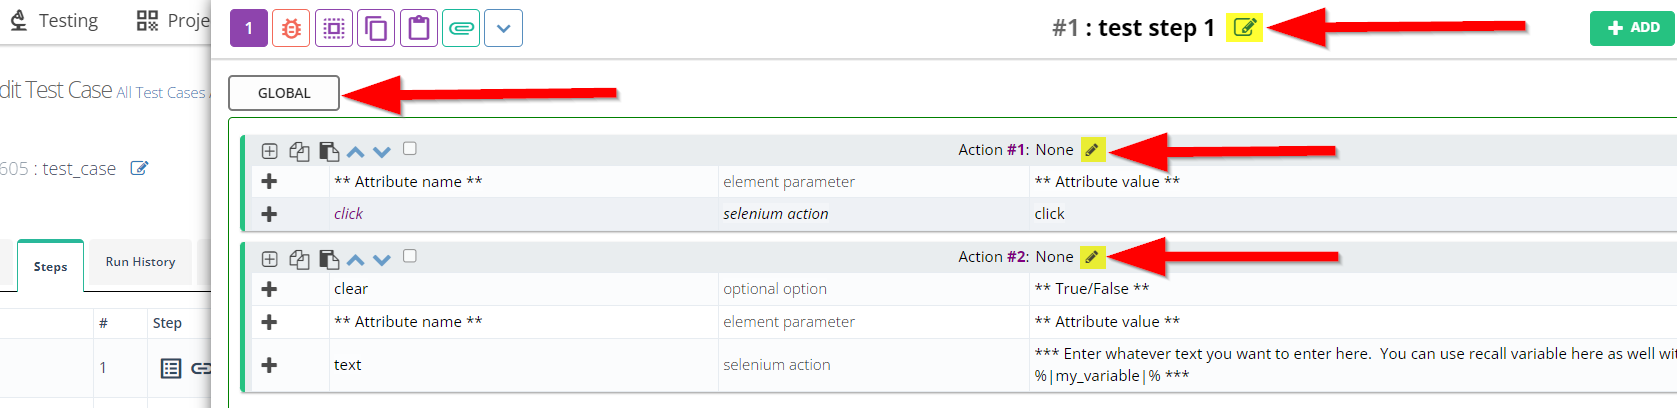
However, two more parameters are available, one is GLOBAL and the other one is LOCAL. If the actions are being saved in GLOBAL mode then those actions can be used for later test cases as they remain saved but if the actions are being saved in LOCAL mode then those actions will be saved only once and cannot be used for other test cases.
Description: It briefly describe the actions that are being performed in each and every step of the test cases.
Expected: The expected output that we will get from the actions mentioned in each step is mainly represented by this.
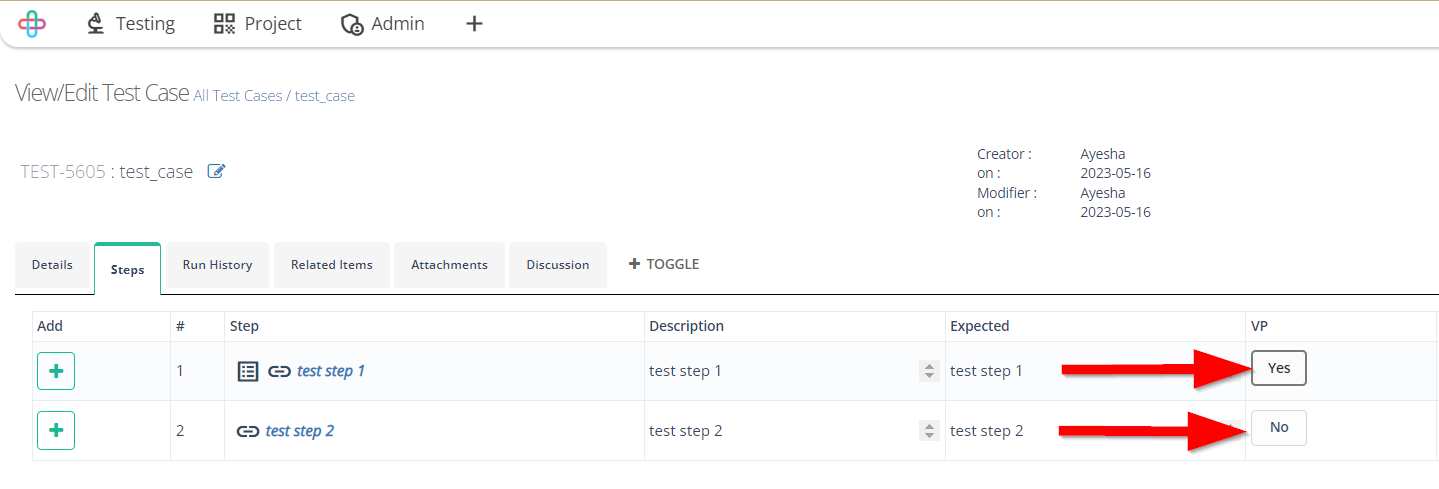
Verification Point(VP): It is the central feature of automated testing. According to the requirement, if the test case is verified then select the point Yes and if it is not verified then select No.
Duration: It actually refers to the time of the steps that takes to carry out all the actions that need to be performed.
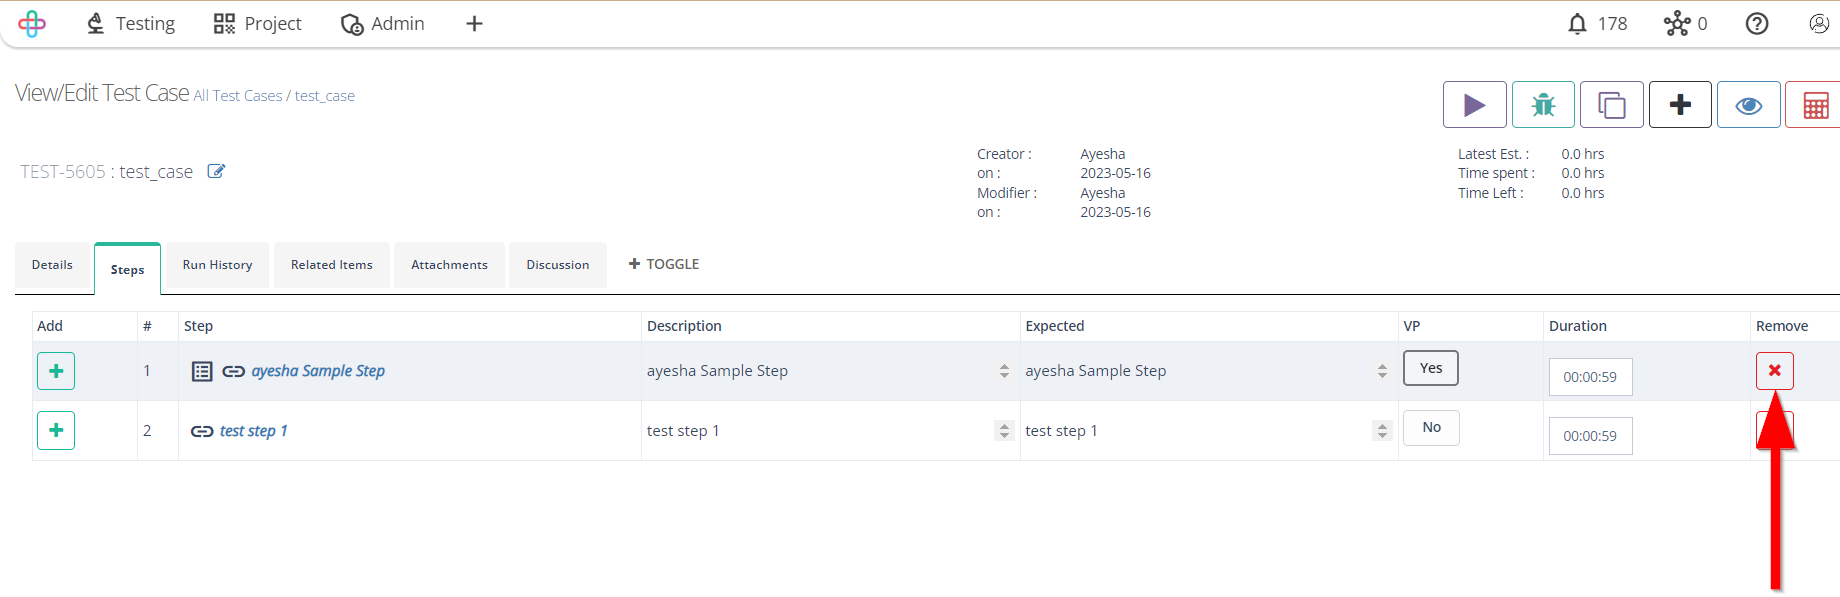
Remove: If any of the rows is not needed then it can be removed just by clicking on the red marked cross sign "X".
Steps#
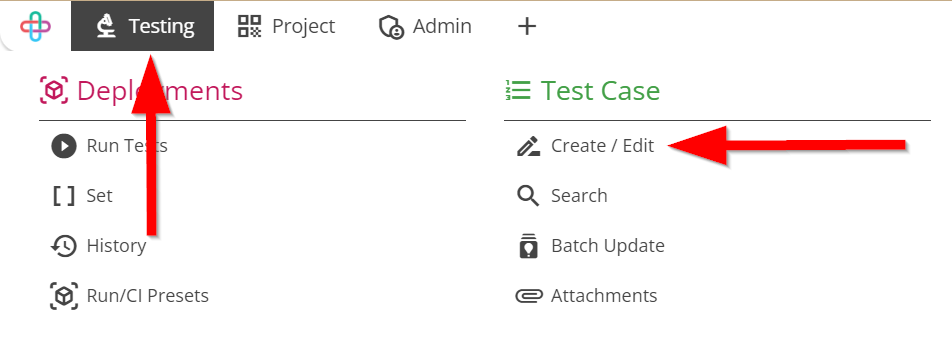
- From the Menu bar, go to the Testing then Create/Edit option.
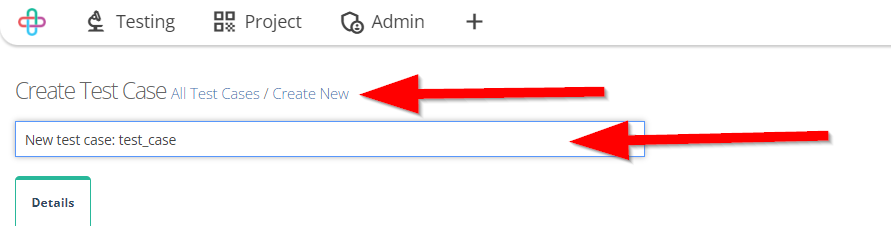
Go to the Create Test Case page.
Enter the title of the test case.
The purpose of the Create Test Case page is to define and document specific test scenarios, steps, and expected outcomes for systematic testing and validation.
Entering the Title of the test case is necessary for clear identification and communication of the test's objective and scope.
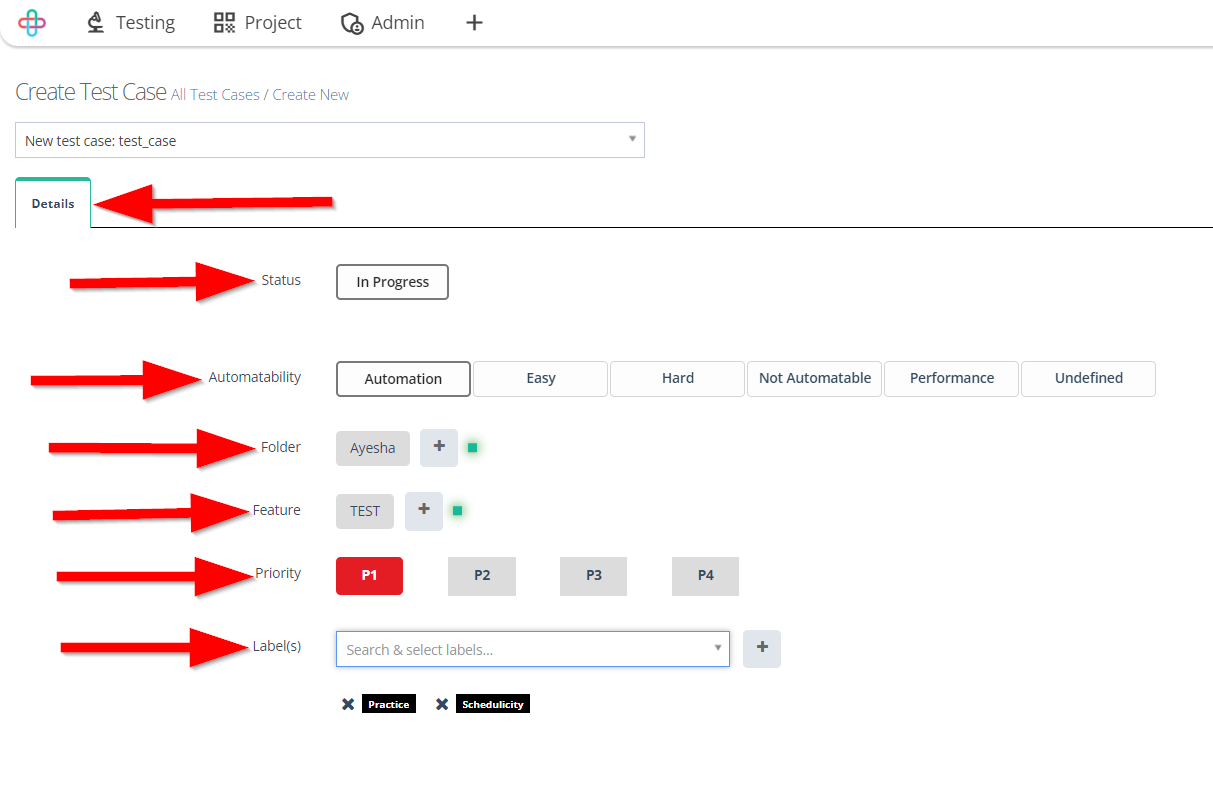
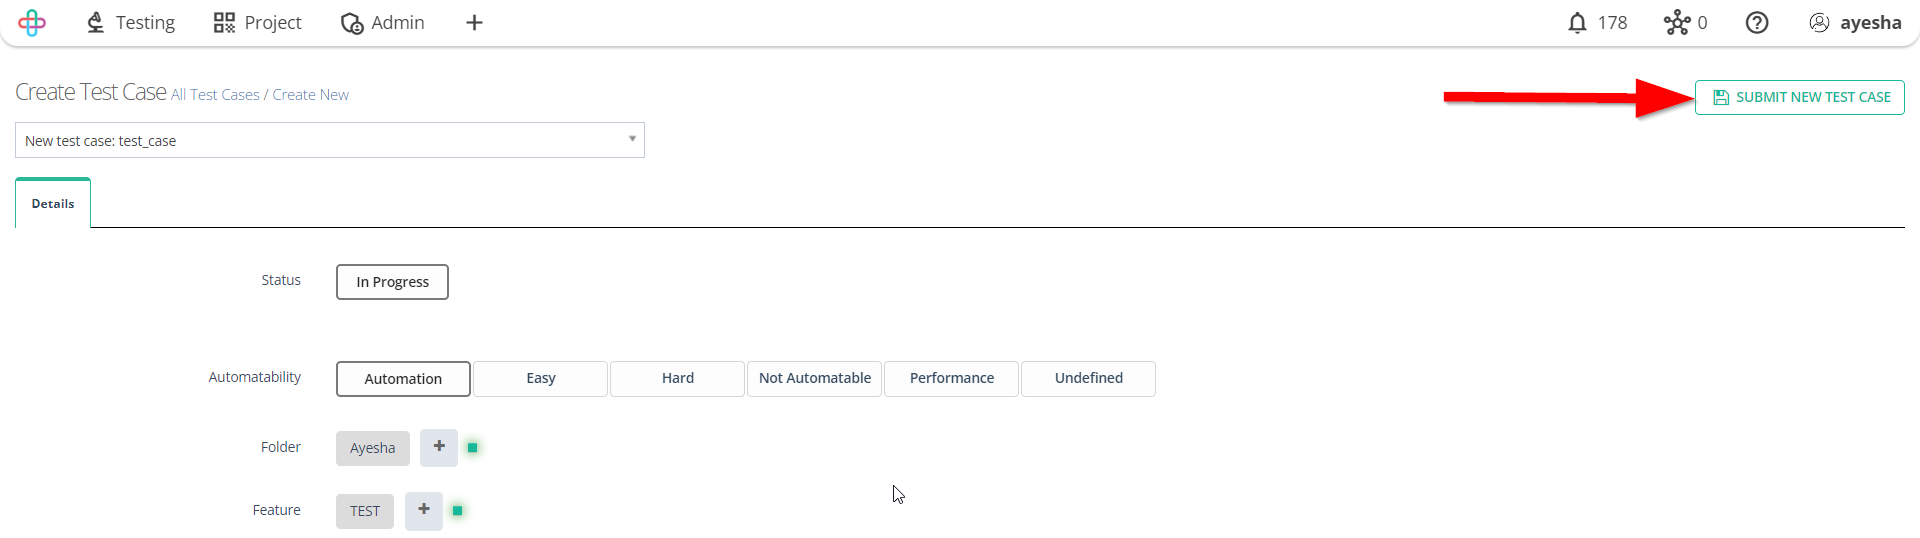
- Fill up the information of Details tab like:
- Status,
- Automatability,
- Folder,
- Feature,
- Priority,
- Labels.
Multiple of Labels can also be selected.
Filling up the information in the Details tab is necessary to provide comprehensive context, objectives, and requirements for the test case's execution and understanding.
Status: Status refers to the current state or condition of a test case, indicating whether it has been executed, passed, failed, is in progress.
Automatability: Automatability refers to the extent to which a test case or process can be automated using testing tools or scripts.
Folder: Folder refers to a categorized and organized container that groups related test cases together for easier management and navigation.
Feature: Feature refers to a specific functionality, component, or aspect of the software that is being tested for its performance and correctness.
Priority: Priority refers to the relative importance or order in which test cases should be executed based on their significance in meeting testing goals and objectives.
Labels: Labels refers to descriptive tags or markers assigned to categorize and group test cases based on specific characteristics or attributes.Selecting multiple of Labels is necessary to efficiently organize and classify test cases into various relevant categories, facilitating better test management, filtering, and identification of specific scenarios.
- Click on the Submit New Test Case button.
The function of Submit New Test Case button is to save and record a newly created test case with its defined details and steps for future execution and reference.
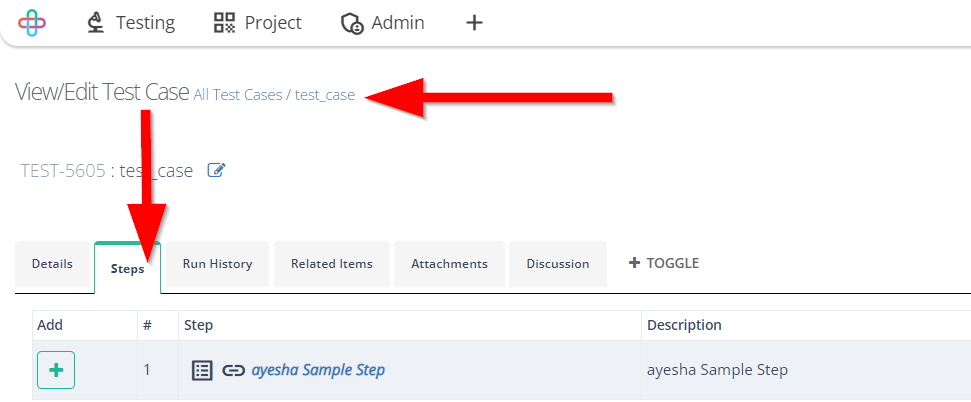
Go to the View/Edit Test Case page.
Click on the Steps tab.
The purpose of the View/Edit Test Case page is to provide a platform to review, update, and manage the test case's information, steps, and attributes.
The Steps tab contain the following fields in the column of the table:
- Add(+)
- Steps Number(#)
- Step
- Description
- Expected
- VP(Verification Point)
- Duration
- Remove.
Add(+): The function of Add(+) is to insert a new action or step to the test case's execution sequence. Steps Number(#): Steps Number(#) indicates the order and sequence of actions or test steps within the test case.
Step: The function of Step is to provide a detailed description of the actions, inputs, and expected outcomes for executing the test case.
Description: Description provides additional information or context for understanding and executing each specific test step.
Expected: Expected defines the anticipated outcome or result when the corresponding test step is executed correctly.
VP(Verification Point): The function of VP (Verification Point) is to specify checkpoints or criteria to validate and verify whether the actual outcome matches the expected result for a particular test step.
Duration: The function of Duration is to record the time taken to execute a specific test step, aiding in performance analysis and optimization.
Remove: The function of Remove is to delete or eliminate a specific test step from the test case.
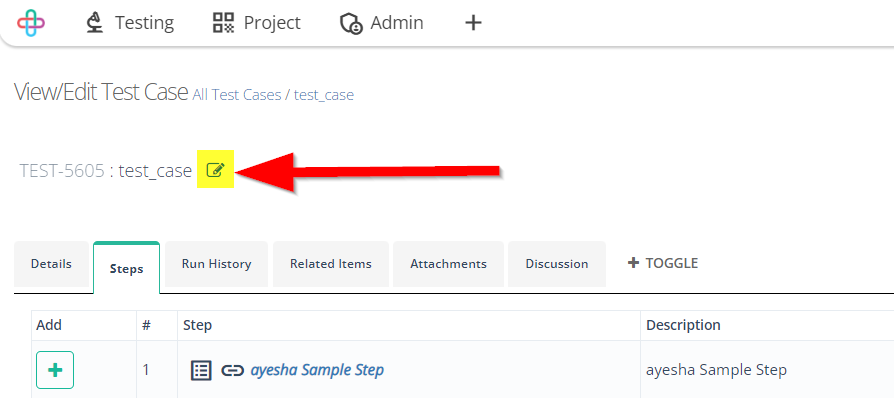
- To rename the title, click on the right button of the Test Case Title.
Renaming the Test Case Title is necessary to accurately reflect the test's purpose, making it easily identifiable and understandable for effective test management and communication.
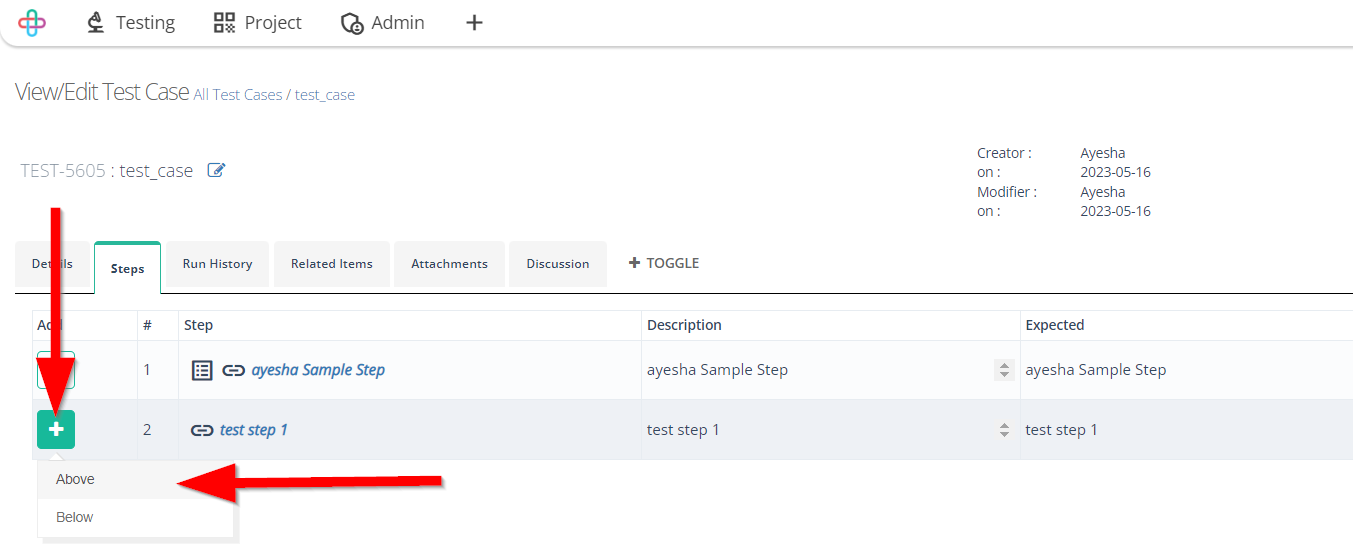
- To add a Step below, first click on the Plus sign(+) of a step then click the Below option.
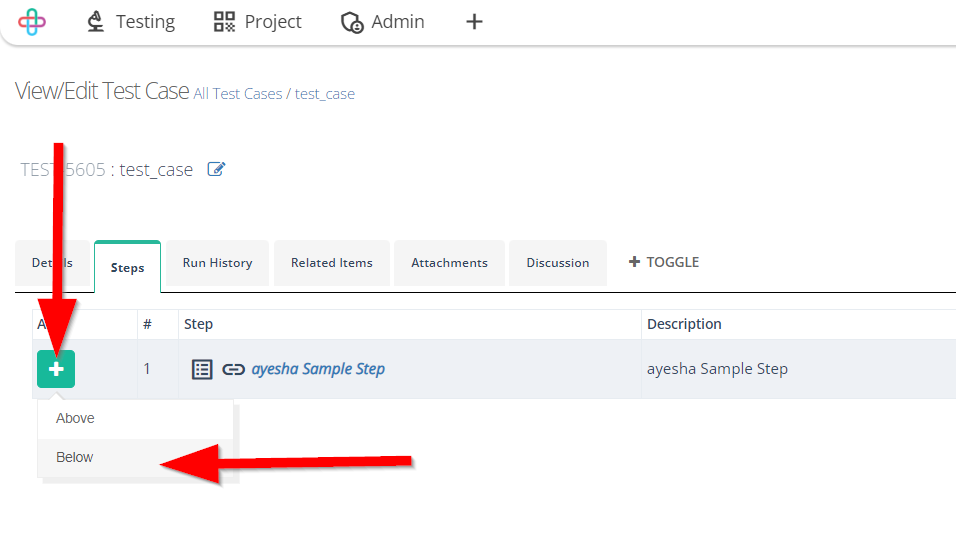
- To add a Step above, first click on the Plus sign(+) of a step then click the Above option.
The purpose of adding Steps (Above/Below) in software testing is to modify the sequence of actions or instructions while preserving the logical flow and integrity of the test case.
- To remove any step, click on the Cross sign(X) of that step.
Removing a Step is necessary to update or refine the test case's content, ensuring accuracy and relevance of test instructions.
- To change Verification Point(VP), click on the Yes/No button under the VP column.
If the Verification Point(VP) is On then the required Test Case will show Failed or if the Verification Point(VP) is Off then the required Test Case will show Blocked.
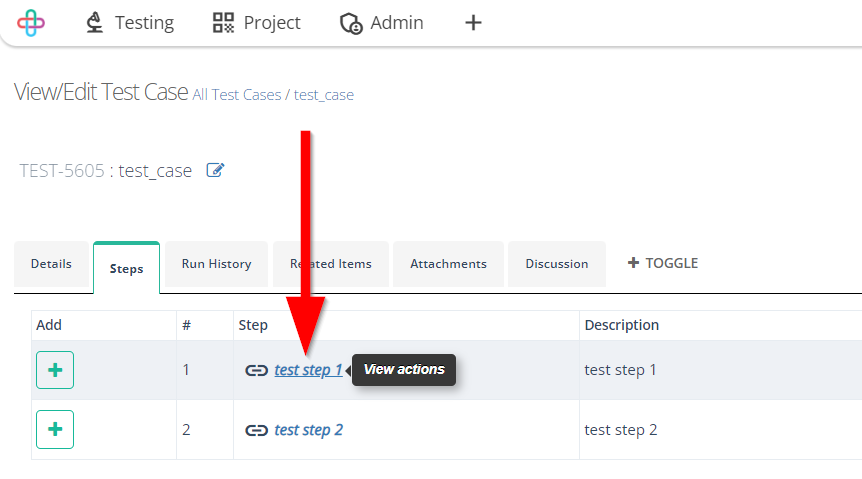
- Click on the required Step.
- To add Actions, click on the +ADD button and then select the required Actions.
- Multiple number of Actions can be added.
The purpose of adding multiple Actions is to comprehensively cover different scenarios and validate diverse aspects of the software's functionality, ensuring thorough testing and accurate results.
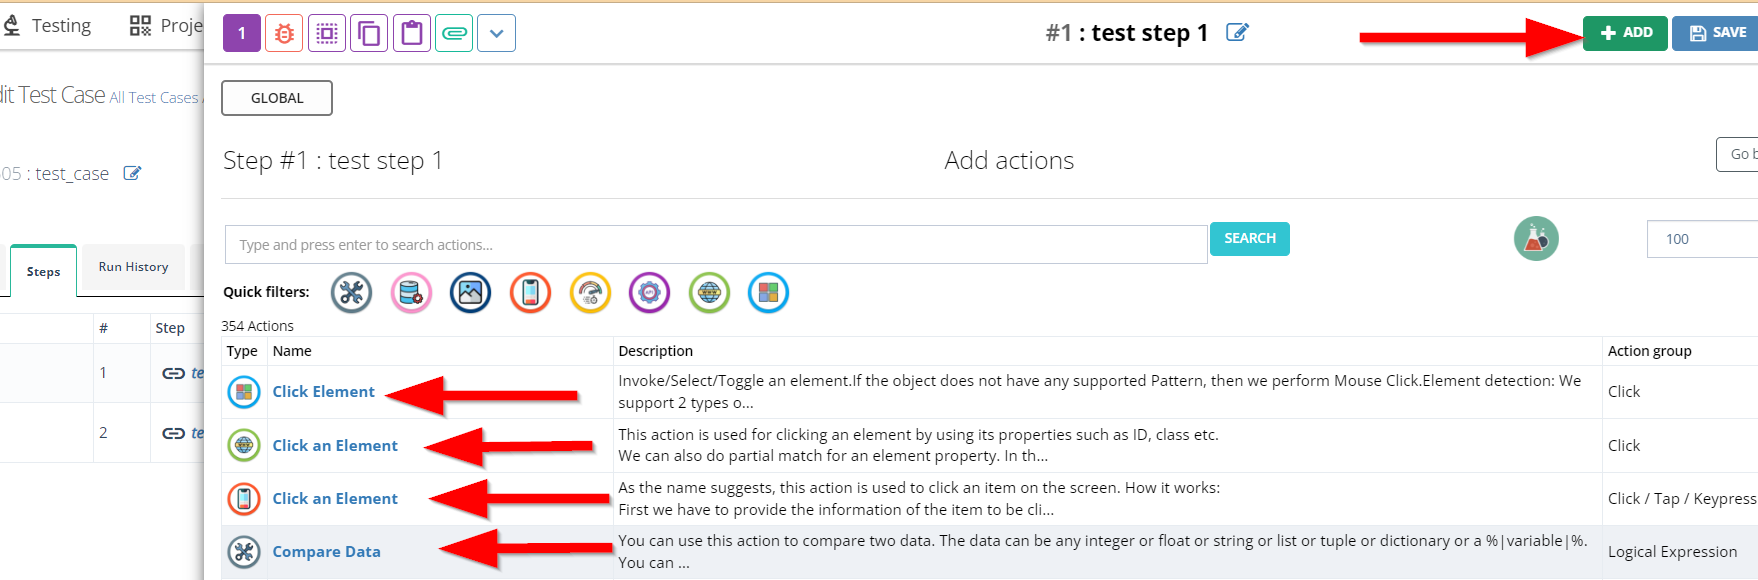
Click to write the Action name.
To convert the Step from Global > Local or Local > Global, click on the GLOBAL button.
To rename the Step, click on the right button of the required Step.
Writing the name of Actions is necessary for clear and concise communication of the specific steps to be executed during testing, ensuring accurate execution and documentation.
Converting Steps from Global to Local or Local to Global is necessary to adjust the scope and context of actions, allowing flexible reuse and maintenance of test case components across different scenarios or levels of testing.
Renaming a Step is necessary to accurately reflect the action being performed, enhancing clarity and understanding during test execution and analysis.
- Click on the SAVE button.